ESXi core dumps are not exactly new material to write about, but I needed to brush up my knowledge and sometimes the best note taking is just writing a post.
I’m going to cover how to review, manage, and validate ESXi core dump configurations, with a focus on utilizing the vSphere Dump Collector as it’s likely the most commonly used in practice. I’ll also share scripts to quickly configure and report on the network core dump status on a fleet of hosts. Our goal is to be prepared for the event a host crashes and quickly retrieve core dumps for support to analyze.
Let’s jump in.
A few caveats before diving in:
- I will be using hosts running 8.0 U3b as reference that were not deployed using auto deploy.
- Hosts provisioned using vSphere Auto Deploy do not have a local disk to store core dumps on.
- ESXi Dump Collector is not supported to be configured on a VMkernel interface that is running on a NSX-T N-VDS switch.
Core dump storage location options
The best place to start understanding the ESXi core dump configuration is by examining the default or current state.
Open a console on a ESXi host and run esxcli system coredump to view the available coredump namespaces.

There are three storage location options that can be used in conjunction with each other. We can run commands to query the configuration status of each of them and establish a baseline to build on.
File based core dump
Core dumps can be written to a file on a local datastore, either VMFS or NFS. This is the default configuration for persistent installations. Note: VMFS datastores on software iSCSI do not support core dump files.
Current state configuration can be checked with esxcli system coredump file list.
Here’s a useful KB in configuring file based core dumps, as well as documentation here.
Network based core dump
Core dumps can be written to a vCenter server for centralized storage. It is not enabled by default. I will go into detail on the configuration below, but documentation can be found here.
Current state configuration can be checked with esxcli system coredump network get.
Partition based core dump
Core dumps can written to a dedicated ESXi partition. It is not enabled by default. I will not be covering this method at the time of publication.
Current state configuration can be checked with esxcli system coredump partition get.
Here’s a useful KB in configuring a diagnostic core dump partition.
Security considerations
Core dumps by nature may contain sensitive information. Be mindful to configure a storage location that supports your organizations data-at-rest encryption needs.
vSAN encrypted core dumps can be decrypted or re-encrypted on an ESXi host by using the crypto-util CLI. Documentation on that process can be found here.
Reviewing file based core dump configuration
Let’s explore further by expanding on the esxcli system coredump command, run esxcli system coredump file list in the ESXi shell. This file based core dump is enabled by default on persistent installations.

We can see where the dumpfile is stored, it’s size, and it’s active state. Note the datastore UUID following /vmfs/volumes/<UUID>.
Running esxcli storage filesystem list will list the volumes available to the host, which will help decipher where the core dump file is being saved.
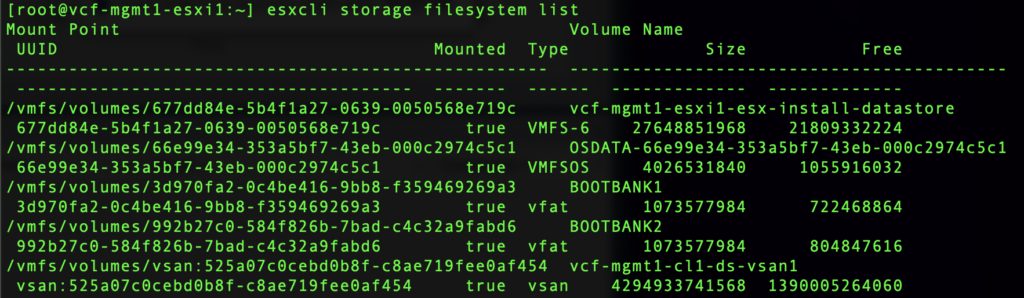
Here we can match the UUID 677dd84e-5b4f1a27-0639-0050568e719c and see that the coredump file is being saved on the vcf-mgmt1-esxi1-esx-install-datastore datastore.
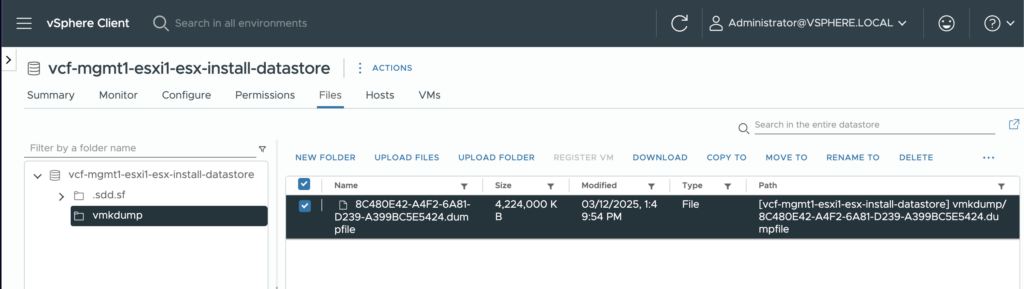
This can be further validated using the vSphere Client and browsing to the datastore.
Configure network based core dump
vCenter has a built in Dump Collector service to receive core dump files from ESXi. This isn’t enabled out of the box because it’s possible to run a standalone host. We’ll first configure vCenter to collect core dumps, then configure ESXi to send core dumps to the service – making necessary adjustments along the way.
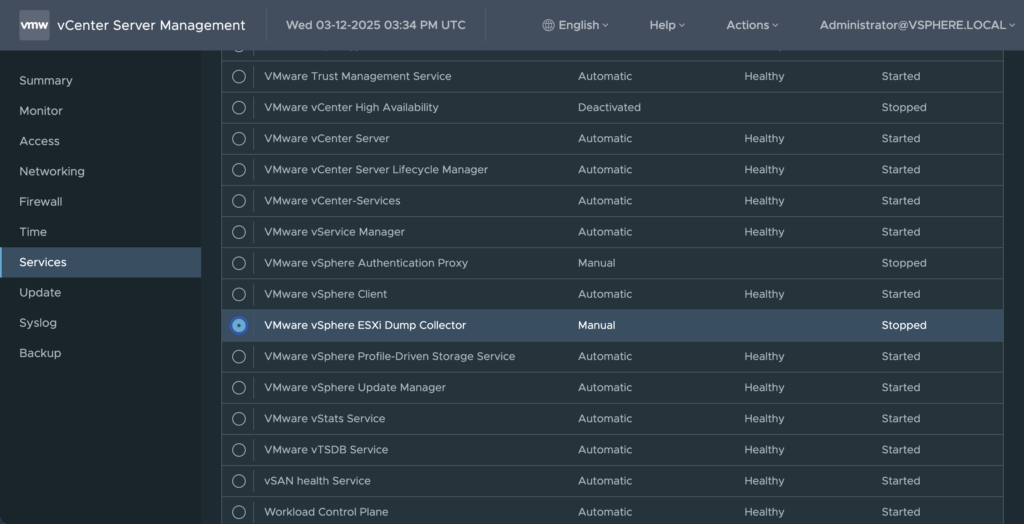
To configure the vSphere Dump Collector service, login to the vCenter VAMI interface, navigate to Services, and start the VMware vSphere ESXi Dump Collector service and set the service startup type to Automatic. This will ensure the service starts on boot.
Now we’ll configure ESXi to send core dumps to the collector service. Using the host console, run the command esxcli system coredump network get to verify network coredump is not configured.

Now we’ll configure network core dump by running esxcli system coredump network set --interface-name vmk0 --server-ipv4 <vCenter IP> --server-port 6500.
Next, run esxcli system coredump network set --enable true to enable network core dump.
We can validate the configuration with esxcli system coredump network get .

Lastly, we can validate network core dump is working with the command esxcli system coredump network check.

Modify vCenter coredump limits
Sending core dumps to vCenter is one thing, but we also need to consider managing the storage consumed by coredump files on vCenter. We need to ensure there’s enough capacity to retain core dump files, but also not storing excessive files and potentially causing vCenter to crash – that would be bad. Let’s take a look at the default configuration to find answers for these concerns.
The vSphere ESXi dump collector service configuration is in file : /etc/sysconfig/netdumper on the vCenter appliacen. We can view the current configuration by running cat /etc/sysconfig/netdumper.
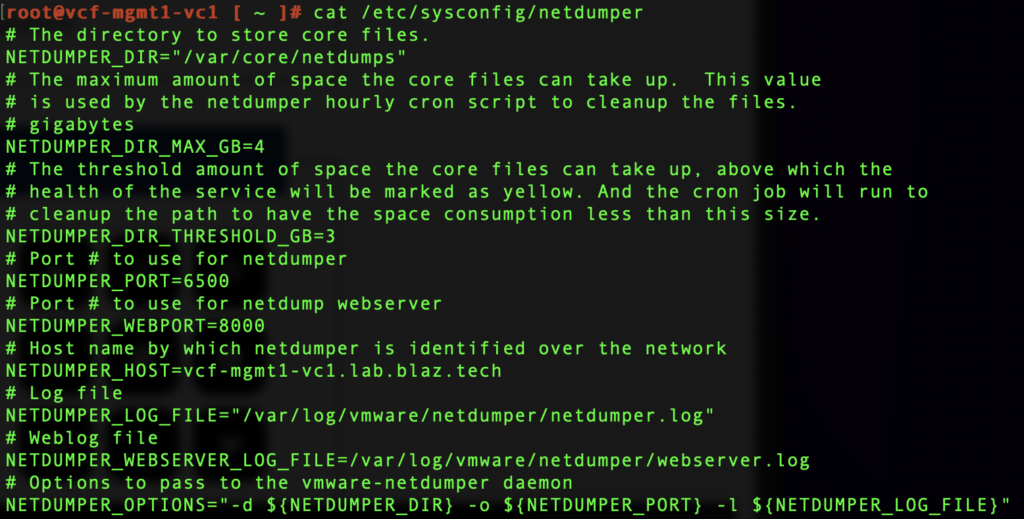
There are two key variables to adjust as needed:
NETDUMPER_DIR_MAX_GB – The maximum amount of space the core files can take up. This value is used by the netdumper hourly cron script to cleanup the files.
NETDUMPER_DIR_THRESHOLD – The threshold amount of space the core files can take up, above which the health of the service will be marked as yellow. And the cron job will run to cleanup the path to have the space consumption less than this size.
Any changes to this configuration need to followed by restarting the netdumper service, run service-control --restart vmware-netdumper.
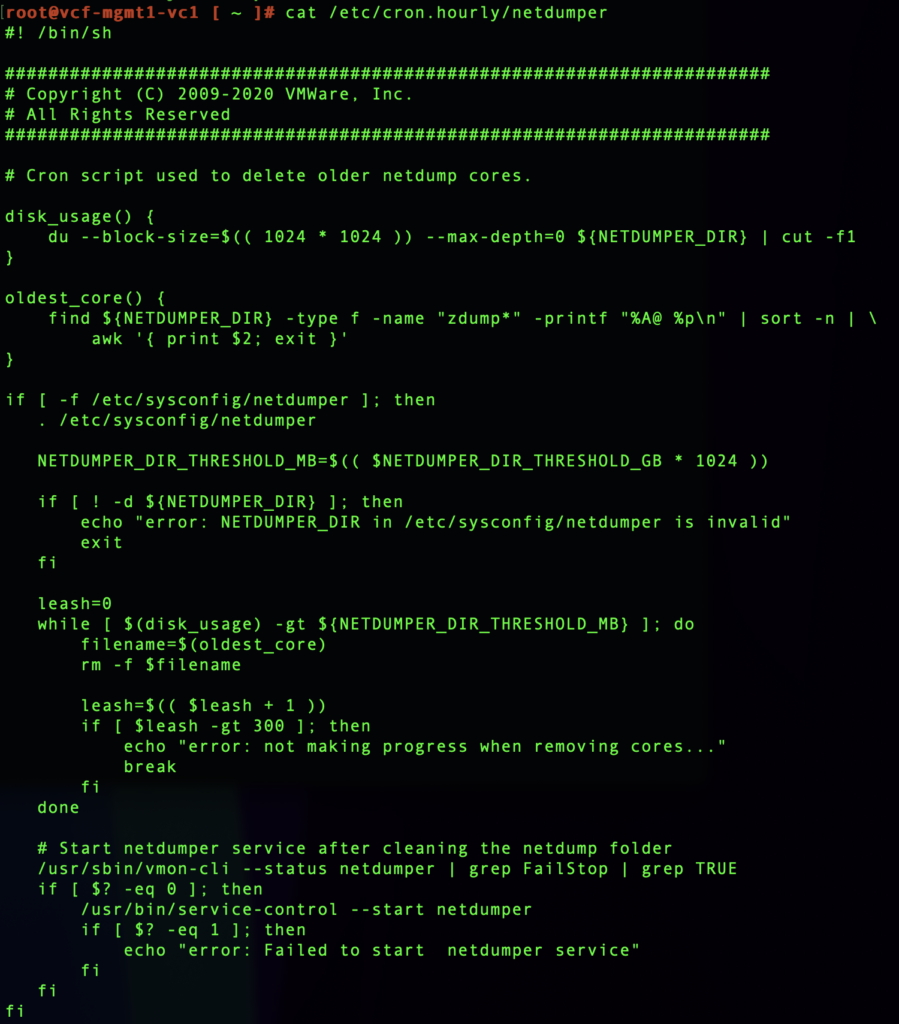
These values can be increased or decreased depending on your environment. More importantly, there’s a hourly cron job that will truncate the oldest coredump files exceeding the threshold. Therefore, sending coredumps to vCenter will not cause excessive disk usage.
You can review the cron job to see exacltly what it’s doing by running cat /etc/cron.hourly/netdumper.
Great, but what if you want more assurance the there’s enough capacity for even default minimum configuration?
Run df -h /var/core/netdumps.

In my case, 24GB of space is available and we know from the configuration above that core dumps will never consume more than 4GB of space.
Let’s PSOD a host
We’ve confirmed that core dumps are configured to write to a local datastore and to be sent to the collector service on vCenter. Let’s run a test to ensure it’s working as planned and we know how to retrieve the files in a time of need. It’s better to go through this exercise now before a failure occurs and production is down. Let’s PSOD a host.
Just in case it needs to be said: Don’t do this on a production host.
We’re going to use the vsish utility to simulate a PSOD, then examine the core dump files that would later be used for a support case if needed.
Before we start, if you’re testing this on a nested lab, ensure your management distributed port group has MAC address changes and Forged Transmits set to Accept. Lastly, MAC Learning should also be enabled. Otherwise, you will see the core dump process fail to connect to vCenter.
On your very-non-production host configured for network core dumps enter vsish, then run set /reliability/crashMe/Panic.

My host crashed immediately:
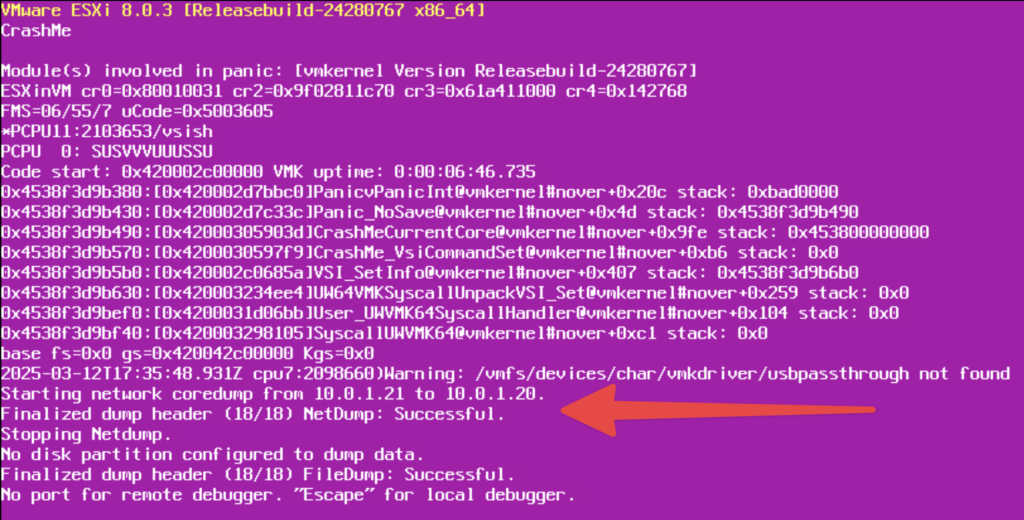
Here we see in the PSOD, NetDump: Successful. The core dump file has been trasnfered to vCenter an the host can be rebooted.
vCenter stores core dump files in the /var/log/vmware/netdumper directory.
Let’s move on and validate the core dump files were created and we can retrieve them.
Validating and retrieving ESXi core dump files from vCenter
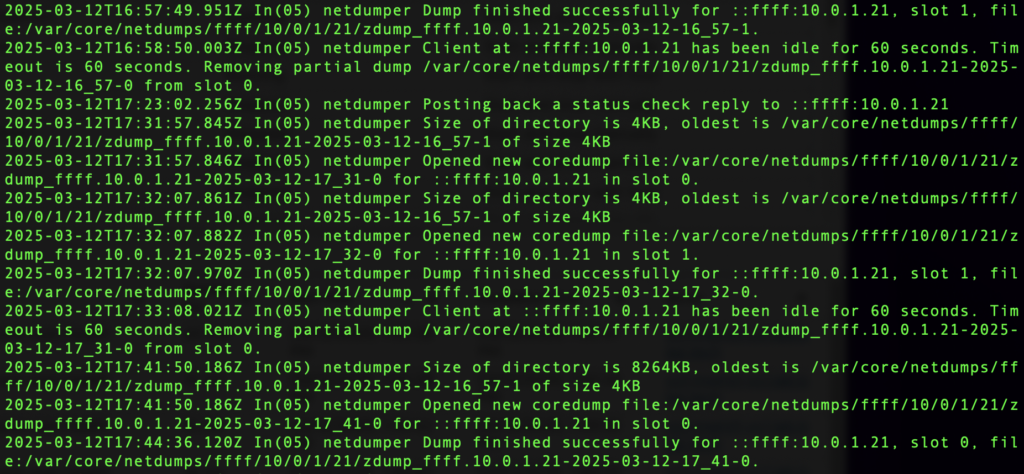
Login to the vCenter shell and run cat /var/log/vmware/netdumper/netdumper.log.
Scrolling up to find the beginning of the core dump transfer, we see the core dump being created: netdumper Opened new coredump file:/var/core/netdumps/ffff/10/0/1/21/zdump_ffff.10.0.1.21-2025-03-12-16_57-0 for ::ffff:10.0.1.21 in slot 0.

Scrolling back down, we see where the core dump is stored in the last line. Note that the file path uses the host IP address: netdumper Dump finished successfully for ::ffff:10.0.1.21, slot 0, file:/var/core/netdumps/ffff/10/0/1/21/zdump_ffff.10.0.1.21-2025-03-12-17_41-0
Moving into this directory and inspecting the core dump files, we find that the total core dump size is 532MB.

Given the 3GB default threshold in /etc/sysconfig/netdumper, I can store store six concurrent core dumps before the cron job cleans them up.
SCP is the easiest method to retrieve these files, which I will not detail here.
Retrieving core dump files from an ESXi host
We can also retrieve the core dump file directly from ESXi (if accessible) since the host was also configured for file based core dump. The file can be found the directory on ESXi. Again, running esxcli system coredump file list will tell us exactly where the file is located.
In my case, it’s: /vmfs/volumes/677dd84e-5b4f1a27-0639-0050568e719c/vmkdump/8C480E42-A4F2-6A81-D239-A399BC5E5424.dumpfile.
There are several ways to retrieve the dump file. I won’t detail them here, but to get you started, they are:
- SCP
- vSphere Client
- PowerCLI
- ESXi Embedded Host Client
Cool, but I have thousands of hosts
I hear you already: “This is fine and great for a single host in a lab, but I have thousands of hosts to configure.” I feel your pain and have your back.
Host profiles can be used. Additionally and preferred, vSphere Configuration profiles can also be used with the exception of clusters managed by NSX (at least at the time of writing this).
If you prefer to use PowerCLI, read on.
Disclaimer: The following scripts were written and validated against my small lab. Your milage may vary based on many factors and you should absolutely test against a non-production environment. Use at your own risk.
Step 1: Run script to configure hosts
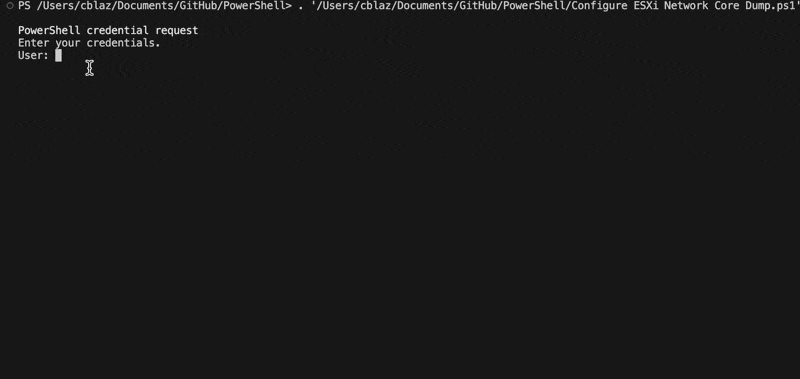
Here’s a PowerCLI script I wrote that will connect to a vCenter and configure network core dump on each ESXi host in vCenter.
# Script Configuration
$vCenterFqdn = "vcenter.example.com"
$netDumpServer = "10.0.1.20"
$netDumpPort = 6500
$vmKernelNic = "vmk0"

# No need to edit past here

$creds = Get-Credential
Connect-VIServer -Server $vCenterFqdn -Credential $creds
Write-Host ""

Write-Host "Checking hosts in vCenter: " -ForegroundColor Green -NoNewline
Write-Host $vCenterFqdn -ForegroundColor White
Write-Host ""

foreach ( $vmHost in Get-VMHost) {
    Write-Host "Configuring netdump on: " -ForegroundColor Green -NoNewline
    Write-Host $vmHost.Name -ForegroundColor White

    try {
        $esxcli = Get-EsxCli -VMHost $vmHost -V2

        # Need to send IP, Port, and interface first
        $args = $esxcli.system.coredump.network.set.CreateArgs()
        $args.serveripv4 = $netDumpServer
        $args.serverport = $netDumpPort
        $args.interfacename = $vmKernelNic
        $esxcli.system.coredump.network.set.Invoke($args) | Out-Null

        # Lastly, enable network core dump
        $args = $esxcli.system.coredump.network.set.CreateArgs()
        $args.enable = "true"
        $esxcli.system.coredump.network.set.Invoke($args) | Out-Null

        # Validate network core dump is enabled
        Write-Host $esxcli.system.coredump.network.check.Invoke() -ForegroundColor Green
        Write-Host ""
    } catch {
        Write-Host ("ERROR: Failed to configure network core dump on $($vmHost.Name): $_") -ForegroundColor Red
    }
}

Disconnect-VIServer -Server $vCenterFqdn -Confirm:$False
This script can be found on GitHub here – it will likely be more current than what’s here.
Step 2: Run script to validate host configuration
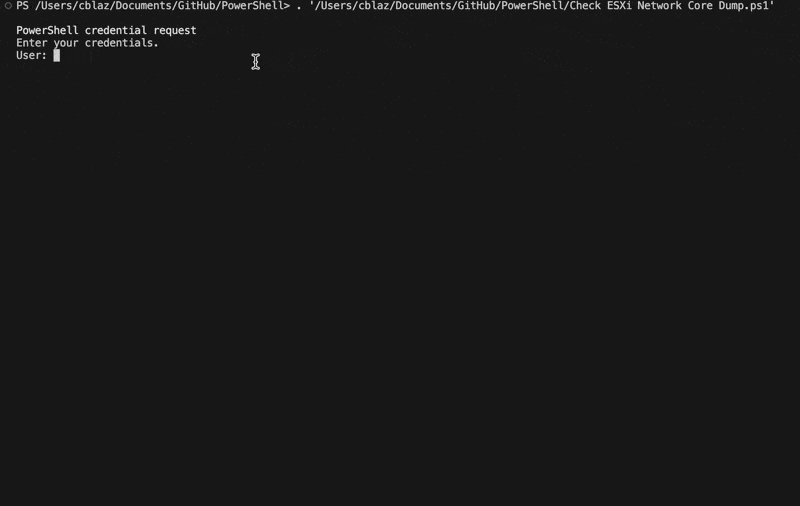
Next, we need to validate the network core dump configuration on each host, which can easily be turned into an auditor during an audit for any applicble control objectives. Here’s a PowerCLI script I wrote that will connect to a vCenter and query the network core dump configuration status from each host. The script can optionally export to .csv for reporting purposes.
# Script Configuration
$vCenterFqdn = "vcenter.example.com"
$generateCsv = $true #or $false
$csvFileLocation = "/path/to/your/vmHost-Network-Core-Dump-Status.csv"

# No need to edit past here

$creds = Get-Credential
Connect-VIServer -Server $vCenterFqdn -Credential $creds
Write-Host ""

$output = @()

Write-Host "Checking hosts in vCenter: " -ForegroundColor Green -NoNewline
Write-Host $vCenterFqdn -ForegroundColor White
Write-Host ""

foreach ( $vmHost in Get-VMHost) {
    $esxcli = Get-EsxCli -VMHost $vmHost -V2
    $coreDumpStatus = $esxcli.system.coredump.network.get.Invoke()

    Write-Host "--- " $vmHost.Name " ---" -ForegroundColor Yellow

    Write-Host "Enabled: " -ForegroundColor Green -NoNewline
    Write-Host $coreDumpStatus.Enabled -ForegroundColor White

    if ($coreDumpStatus.Enabled) {
        Write-Host "HostVNic: " -ForegroundColor Green -NoNewline
        Write-Host $coreDumpStatus.HostVNic -ForegroundColor White

        Write-Host "IsUsingIPV6: " -ForegroundColor Green -NoNewline
        Write-Host $coreDumpStatus.IsUsingIPV6 -ForegroundColor White

        Write-Host "NetworkServerIP: " -ForegroundColor Green -NoNewline
        Write-Host $coreDumpStatus.NetworkServerIP -ForegroundColor White

        Write-Host "NetworkServerPort: " -ForegroundColor Green -NoNewline
        Write-Host $coreDumpStatus.NetworkServerPort -ForegroundColor White
    }

    Write-Host ""

    $coreDumpConfig= [PSCustomObject]@{
        "vmHost" = $vmHost.Name
        "Enabled" = $coreDumpStatus.Enabled
        "HostVNic" = $coreDumpStatus.HostVNic
        "IsUsingIPV6" = $coreDumpStatus.IsUsingIPV6
        "NetworkServerIP" = $coreDumpStatus.NetworkServerIP
        "NetworkServerPort" = $coreDumpStatus.NetworkServerPort
    }

    $output += $coreDumpConfig
}

if ($generateCsv) {
    try {
        $output | Export-Csv -Path $csvFileLocation -NoTypeInformation
    } catch {
        Write-Host "Error generating .csv file:" $_  -ForegroundColor Red
    }
}

Disconnect-VIServer -Server $vCenterFqdn
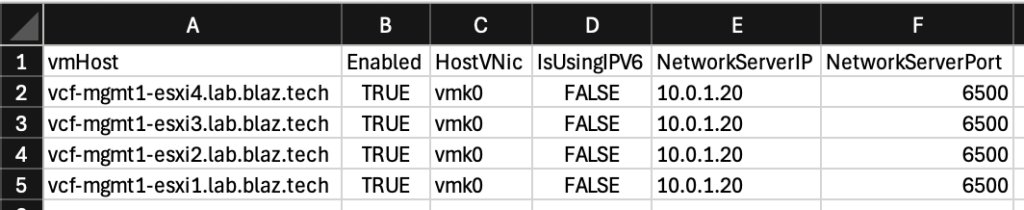
Here’s what the .csv export looks like:
This script can be found on GitHub here – it will likely be more current than what’s here.
Wrapping up
There’s a lot of flexibility to store core dumps in the most optimal location that fits your environments functional and security needs. However you obtain the logs, they can now be collected and uploaded to a VMware support case for further analysis.